How to Display P6 Durations in Both Hours & Days
Someone recently asked me if it was possible to display two duration columns in a Primavera P6 layout, one column in hours and the other in days. This tutorial outlines the steps required to display two different units of durations.
Tutorial Complexity: Beginner
P6 Version: Release 18.8.0
Create a custom field for second duration unit
You might be wondering (just like I did) why one would need to display durations in more than one unit but apparently, this was a site schedule (Level 5 schedule) where durations are all in hours and the manager also wanted to see durations in days as the schedule had two calendars. Some activities were on a 24-hour calendar while others were on a 12-hour calendar.
Assuming we have the schedule below with durations in hours and we want to add another column to show durations in days.
We start by creating a custom field called User Define Field (UDF) in P6 and to do this, from P6 menu click on Enterprise >> User Define Fields and this will open the User Define Fields dialog.
In the dialog, select Activities from the dropdown box (arrow 1) and then click on Add (arrow 2) and a new field will be created. Change the title of this this field to Duration in Days (arrow 3) and change the data type to Number (arrow 4). Finally click Close (arrow 5) to exit the dialog.
To add this newly created UDF to the layout, from P6 menu, click on View >> Columns to open the Columns dialog.
From the Available Options section of the dialog, double-click the newly created UDF, Duration in Days from the User Defined grouping (arrow 6) and this will move this field to the Selected Options section (arrow 7). Click Ok to exit the dialog (arrow 8).
The Duration in Days column now appears in our layout but you will notice it is empty. To populate this column, we need to run a Global Change. Global Change is a powerful P6 feature that enables user make changes to activities, resource assignments or project expenses.
A powerful tool for simple arithmetic
From P6 menu, click on Tools >> Global Change to open the Global Change dialog.
Click on Modify (arrow 10) to open the Modify Global Change dialog.
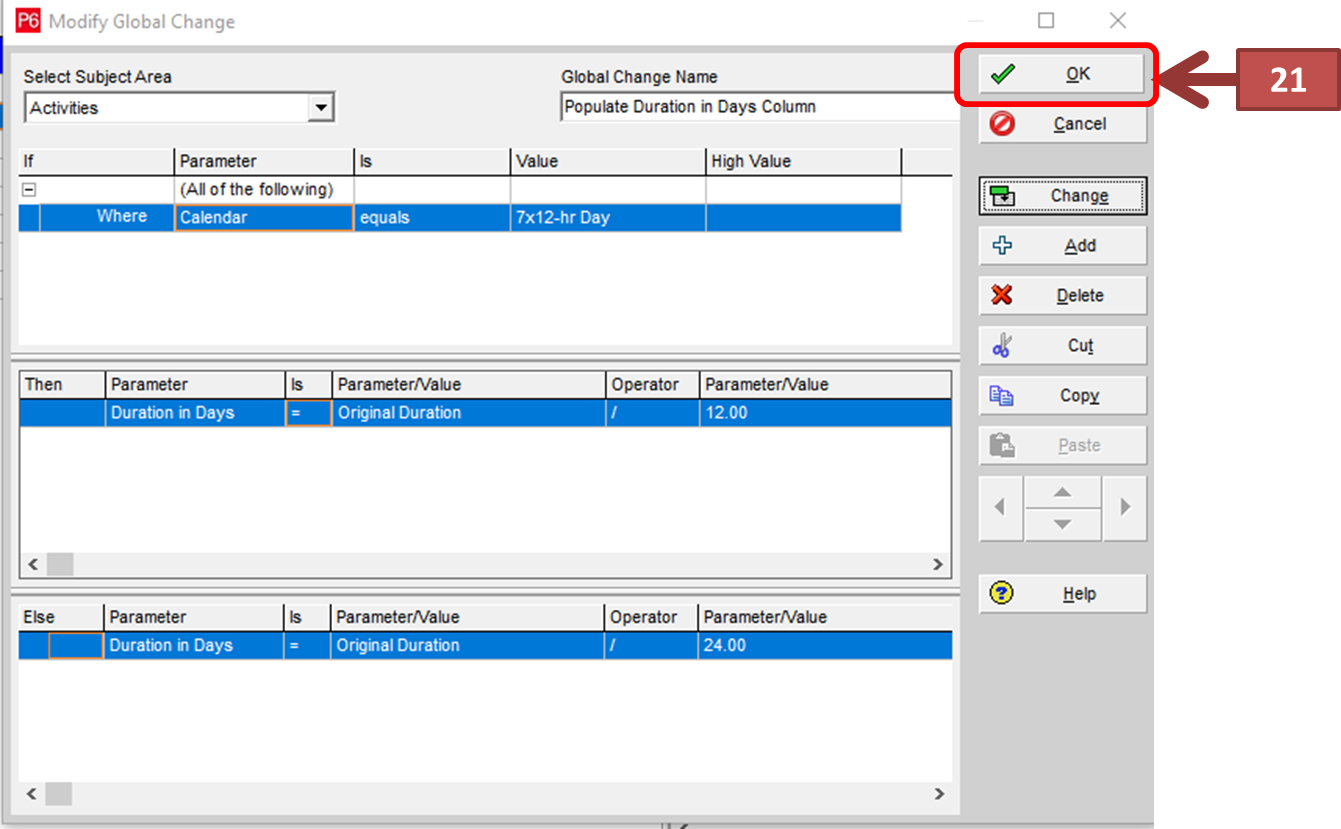
Pick Activities in the Select Subject Area dropdown (arrow 11), this is because Original Duration (i.e. Duration in Hrs) which we want to use belongs to Activities. Then enter a suitable name for the Global Change so that it easily recognised from the list of Global Change (arrow 12).
Next, we are going to get P6 to perform arithmetic calculations to convert hours to days.
Click the IF section of the Modify Global Change dialog and under Parameter select Calendar from the dropdown beside the Where. Under Is, select equals and under Value, select 7x12-hr day calendar (arrow 13). Note that if you only have one calendar in use, you can ignore the IF section.
Click the THEN section of the Modify Global Change dialog and click on the Add button to make the section active. Under Parameter, select Duration in Days, under the first Parameter/Value select Original Duration, under Operator select / and under second Parameter/Value select 12 (arrow 14).
Click the ELSE section of the Modify Global Change dialog and click on the Add button to make the section active. Under Parameter, select Duration in Days, under the first Parameter/Value select Original Duration, under Operator select / and under second Parameter/Value select 24 (arrow 15). Note that if you only have one calendar in use, you can also ignore the ELSE section.
To convert hours to days, we divide the duration in hours by the calendar hours i.e for a 24-hr day calendar activity the formula will be original duration in hrs / 24 while for the 12-hr day calendar the formula will be original duration in hrs / 12. So in summary what we have in arrows 13 to 15 is; IF calendar is 12-hr day THEN divide Original Duration (i.e. Duration in Hrs) by 12 ELSE divide Original Duration (i.e. Duration in Hrs) by 24 for 24-hr day.
To run the Global Change, click on Change button (arrow 16) and a warning message will pop up asking if you wish to proceed as the global change cannot be cancelled after viewing the report.
Click Yes (arrow 17) to open the Global Change Report
The report will show New Values for the Duration in Days field (arrow 18). Next, click on Commit Changes (arrow 19) to populate the Duration in Days field with the calculated values. When prompted to save log file, click on No (arrow 20)
In the Modify Global Change dialog, click OK (arrow 21) to exit the dialog.
The newly created Global Change now appears in the list of Global Changes (arrow 22).
To exit the Global Change dialog, click on Close button (arrow 23).
The schedule layout now has the Duration in Days column populated as shown below (arrow 24).
Future Updates
UDF are not updated automatically, therefore anytime you change Original Duration (Duration in Hrs), the Duration in Days column values will not change, so you will need to remember to run this Global Change after each time analysis (schedule update or F9) to update the Duration in Days column values. The good news is that for future updates, you only need to go to the list of Global Change and select Populate Duration in Days Column (arrow 25) and then click on Apply Change button (arrow 26) and this will take you straight to arrows 17 to 20 steps.


